Achieve Stunning Nails with Micro French Nails: A Step-by-Step Guide
Introduction:
Are you looking to elevate your nail game and make a sophisticated fashion statement?
Look no further than micro French nails! This trendy nail design is taking the beauty industry by storm, offering a chic and refined look that complements any outfit or occasion.
In this comprehensive guide, we will walk you through the process of achieving stunning micro French nails step by step.
Whether you're a nail enthusiast or a professional nail technician, this tutorial will equip you with the knowledge and techniques to create flawless micro French nails.
So, let's dive in!
What Are Micro French Nails?
Before we delve into the details, let's first understand what micro French nails are.
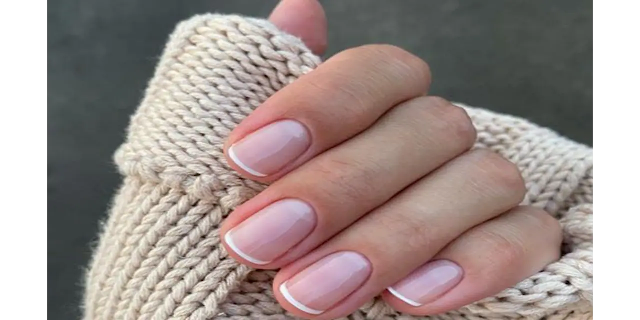
Micro French nails are a modern twist on the classic French manicure.
They feature a thin and delicate white line that is meticulously painted along the free edge of the nail.
This creates a subtle, elegant, and elongating effect, enhancing the natural beauty of your nails.
Micro French nails are versatile and can be customized to suit your personal style, with various color combinations and designs.
Tools and Materials You'll Need
To get started with creating stunning micro French nails, gather the following tools and materials:
1. Nail polish remover
2. Cotton pads or balls
3. Nail clippers
4. Nail file
5. Cuticle pusher
6. Cuticle oil
7. Base coat
8. White nail polish
9. Sheer or nude nail polish
10. Top coat
11. Nail art brush (thin and precise)
12. Nail polish corrector pen (optional)
13. Nail drying spray (optional)
Step-by-Step Guide to Creating Micro French Nails
Now that you have your tools and materials ready, let's walk through the step-by-step process of creating stunning micro French nails:
Step 1: Prepare Your Nails
- Start by removing any existing nail polish using a nail polish remover and cotton pads or balls.
- Use nail clippers to trim your nails to the desired length and shape.
- Gently file the edges of your nails to smooth out any roughness.
- Apply cuticle oil to the base of your nails and use a cuticle pusher to push back your cuticles.
Step 2: Apply Base Coat
- Apply a thin layer of base coat to protect your nails and help the polish adhere better.
Step 3: Apply Sheer or Nude Polish
- Choose a sheer or nude nail polish color that matches your skin tone or desired look.
- Apply one or two coats of the sheer or nude polish, allowing each coat to dry completely before moving on.
Step 4: Create the Micro French Line
- Dip a thin and precise nail art brush into white nail polish.
- Carefully paint a thin line along the free edge of each nail, following the natural curve of your nails.
- Take your time and ensure the line is even and precise.
- If you make any mistakes, you can use a nail polish corrector pen to clean up the edges.
Step 5: Apply Top Coat
- Once the micro French lines are dry, apply a layer of glossy top coat to seal in the design and add shine.
- Make sure to cover the entire nail, including the micro French line.
Step 6: Speed Up Drying Time (Optional)
- If you're short on time, you can use a nail drying spray to accelerate the drying process.
Tips for Perfecting Micro French Nails
To achieve flawless micro French nails, consider the following tips:
1. Practice makes perfect:
Don't get discouraged if your first attempt doesn't turn out perfectly.
Like any artistic skill, creating perfect micro French nails takes practice.
Keep trying, and you'll improve with each attempt.
2. Be patient:
Allow each layer of polish to dry fully before moving on to the next step.
Rushing the process can lead to smudging or uneven results.
3. Use a steady hand:
It's crucial to have a steady hand while painting the micro French line.
Rest your hand on a flat surface for better control, and take your time to ensure precision.
4. Choose the right brush:
Invest in a high-quality nail art brush with a thin and precise tip.
This will make it easier to create thin and even lines.
5. Experiment with color combinations:
While the classic white micro French line is timeless, don't be afraid to experiment with different color combinations.
Try using metallic shades, pastels, or even glitter for a unique twist.
6. Maintain your nails:
Keep your nails well-maintained by moisturizing your cuticles regularly and avoiding harsh chemicals.
Healthy nails provide a better canvas for your micro French design.
7. Customize the width of the line:
Depending on your preference, you can adjust the width of the micro French line.
Experiment with thinner or slightly thicker lines to find the look that suits you best.
8. Add embellishments:
If you want to take your micro French nails to the next level, consider adding small embellishments like rhinestones or nail art decals.
These details can add a touch of glamour and uniqueness to your design.
Conclusion:
Micro French nails offer a sophisticated and timeless look that can elevate your nail game to new heights.
With the step-by-step guide provided in this blog post, you now have the knowledge and techniques to create flawless micro French nails.
Remember to practice, be patient, and have fun experimenting with different color combinations and embellishments.
So go ahead, unleash your creativity, and enjoy the elegance and beauty of micro French nails!


Post a Comment